
Windows: dosya ve klasörleri gizle
Windows gibi çok kullanıcılı sistemlerde, diğer kullanıcıların erişmesini önlemek için klasörleri ve dosyaları gizlemek gerekebilir.
Dosya ve klasörleri hızla gizleyin
En basit çözüm, gizli özniteliği ayarlamaktır.
- Bunu yapmak için, ilgili dosya veya klasörü sağ tıklayın ve "Özellikler" e gidin.
- "Gizli" nin yanındaki kutuyu işaretleyin ve "Uygula" ile onaylayın.
Dosyaları ve klasörleri belirli kullanıcılardan güvenle gizleyin
Ne yazık ki, yukarıda belirtilen hesaplama herhangi bir kullanıcı tarafından kolayca atlanabilir, çünkü dosya gezgini gizli dosyaları veya klasörleri görüntüleme olanağı sunar. Aşağıdaki talimatlarla erişimi çok daha etkili bir şekilde düzenleyebilirsiniz. Şöyle çalışır:
- Gizlenecek dosya ve klasörleri, erişimini düzenleyebileceğiniz toplu bir klasöre taşımanız yeterlidir.
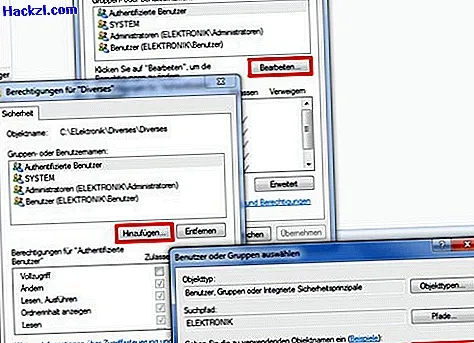
- Şimdi klasöre sağ tıklayın ve içerik menüsünden "Özellikler" seçeneğini seçin.
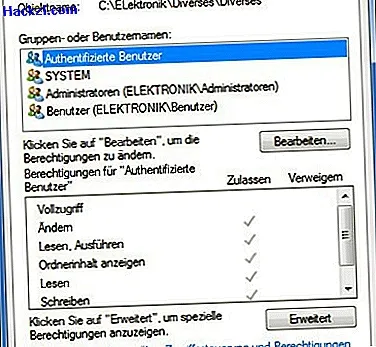
- "Güvenlik" sekmesinde, "Grup ve kullanıcı adları" altında kullanıcı gruplarını göreceksiniz. Belirli bir tanesini tıklarsanız, aşağıdaki kutuda kullanıcının hangi haklara sahip olduğunu görebilirsiniz.
- Artık haklarını kısıtlamak veya mevcut bir kullanıcıyı iptal etmek istediğiniz yeni bir kullanıcı oluşturabilirsiniz.
Erişimini kısıtlamak istediğiniz kullanıcıları ekleyin
Yeni bir kullanıcı belirlemek istiyorsanız, önce aşağıdakileri yapın:
- Şimdi [Düzenle] düğmesine ve ardından [Ekle] düğmesine tıklayın.
- "Kullanıcıları veya grupları seçin" penceresinde, kullanıcının adını girin, örneğin "Sven" ve ardından [Adı kontrol et] düğmesine ve ardından [Tamam] düğmesine tıklayın.
Kullanıcıların klasör ve dosya haklarını iptal etme
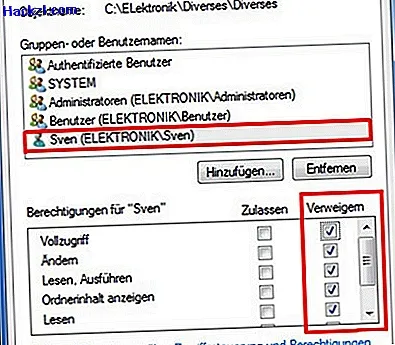
- "Sven" kullanıcısı artık 1. noktadan bildiğiniz listede. Şimdi kullanıcı adını "Sven" ile işaretleyin.
- "'Sven' için yetkiler" alt penceresinde artık geçerli yetkilendirme ayarlarını görebilirsiniz. Dizine tüm erişimi Sven'den kaldırmak için, "Tam erişim" onay kutusundaki "Reddet" sütununu tıklayın ve ardından [Uygula] düğmesine tıklayarak ayarları uygulayın.
- Diğer kullanıcılara erişimi geri almak için tekrar [Ekle] düğmesine tıklayın ve 2. adımla tekrar başlayın.
- Listeye daha fazla kullanıcı veya grup eklemek istemiyorsanız [Tamam] düğmesini tıklayın.
Windows altında hak atamanın bu küçük örnekte gösterilenden çok daha karmaşık olduğunu lütfen unutmayın. Yönetici haklarına sahip herhangi bir kullanıcı yukarıda belirtilen ayarları geri alabilir - ancak bu tüm ayarlar için geçerlidir. Örneğin, küçük bir şirket ağında kısıtlayıcı haklar ataması yapmak istiyorsanız, bu konuyla daha yoğun ilgilenmeniz önemlidir.
Windows 7'de bir klasörü parola ile nasıl koruyacağınızı buradan okuyun.