
Python: GUI programlama - bunu bilmeniz gerekir
Python programları GUI (Grafik Kullanıcı Arayüzü) ile çalıştırıldığında çok daha iyi görünür. Aksi takdirde terminal genellikle bunun için kullanılır. Burada Python'daki TkInter modülünü kullanarak kendi GUI'nizi nasıl programlayabileceğinizi gösteriyoruz.
Python ile GUI programlama: TkInter ile pencere
GUI'nizi gerçekten kullanmaya başlamadan önce, önce TkInter modülünü içe aktarmanız ve bir pencere oluşturmanız gerekir.
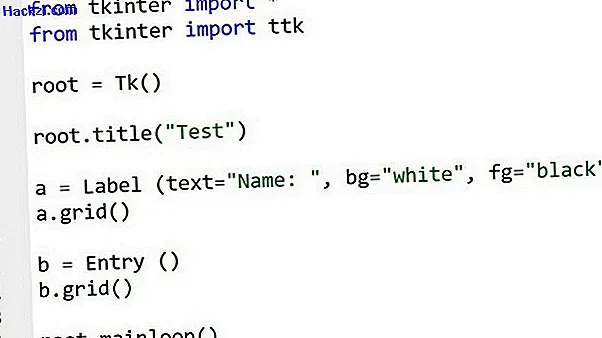
- Modülü içe aktarmak için, kodunuzun en başına "tkinter import *" komutunu ve "from tkinter import ttk" komutunu (tırnak işaretleri olmadan) ekleyin.
- Artık "root = Tk ()" komutuyla yeni bir pencere oluşturabilirsiniz. "Kök" kelimesi yerine başka bir kelime kullanabilirsiniz. Bununla birlikte, her program için aynı değişkenin kullanılması tavsiye edilir, böylece programlamada yolunuzu daha kolay bulabilirsiniz.
- Pencerenizin adını "root.title (" Test ")" komutuyla belirleyebilirsiniz (başında ve sonunda tırnak işaretleri olmadan). Bu durumda pencereye "Test" denir.
- Programınızın sonunda, programın tamamlanması için yalnızca "root.mainloop ()" komutunu girmeniz gerekir.
Python ile TkInter: menü çubuğunu programlayın
Bugünlerde hemen hemen her programda bir menü çubuğu bulunabilir. Bunları ayrıca TkInter modülü ile kolayca programlayabilirsiniz.
- Yukarıdaki adımların tümünü gerçekleştirmiş olmanız önemlidir. Menü çubuğunun kodu "root.title (" Test ")" ve "root.mainloop ()" arasına eklenmelidir.
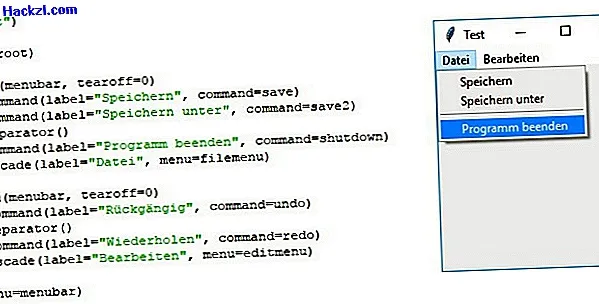
- Menü çubuğunu "menubar = Menu (root)" komutuyla (tırnak işaretleri olmadan) programlamaya başlamalısınız.
- "Filemenu = Menü (menubar, tearoff = 0)" komutuyla bir ilk menü öğesi oluşturabilirsiniz. "Filemenu" değişkeni yerine kendi değişkeninizi de seçebilirsiniz.
- "Filemenu.add_command (label =" Save ", command = save)" komutuyla bir ilk alt öğe ekleyin. Bu durumda alt öğeye "Kaydet" denir. Buna basarsanız, "save ()" komutu yürütülür. Koddaki komutları "root = Tk ()" komutundan önce tanımlamanız önemlidir.
- Artık istediğiniz kadar alt öğe ekleyebilirsiniz. İpucu: Ayrı ayrı alt öğeler arasında bir bölme çizgisi eklemek için "filemenu.add_separator ()" komutunu da kullanabilirsiniz.
- Bir menü öğesiyle işiniz bittiğinde, "menubar.add_cascade (label =" file ", menu = filemenu)" komutunu eklemeyi unutmayın. Bu komut menü öğesine "Dosya" adını verir.
- Başka menü öğeleri eklemek istiyorsanız, menü öğesinin değişkenini yalnızca hata oluşmaması için değiştirmeniz gerekir. "Filemenu" yerine her seferinde "editmenu" kullanabilirsiniz.
- Menü çubuğunuzun da görüntülenmesi için kodunuzun sonundaki "root.mainloop ()" komutundan önce "root.config (menu = menubar)" komutunu eklemeyi unutmayın.
Python ile GUI: etiket ve giriş ekleyin
Artık Python programınıza metinler ve metin alanları eklemeye başlayabilirsiniz.
- "A = Etiket (text =" Ad: ", bg =" beyaz ", fg =" siyah ")" (tırnak işaretleri olmadan) komutuyla bir ilk etiket ekleyebilirsiniz. Bu etiket "a" değişkeni ile temsil edilir ve "Ad:" metnine sahiptir. Metnin yazı tipi rengi siyah, arka planı beyazdır.
- Etiketin görüntülenmesi için altına "a.grid ()" komutunu yazmalısınız. Bir sonraki paragrafta grid () için neye ihtiyacınız olduğunu öğreneceksiniz.
- "B = Giriş ()" komutuyla bir metin alanı oluşturabilirsiniz. Bu durumda metin alanı "b" değişkeni ile temsil edilir.
- Tekrar, grid komutunu tekrar eklemelisiniz: "b.grid ()"
Programlama TkInter: Izgara ve Paket - Geometri Yöneticisi
Grid komutunun neye ihtiyacınız olduğunu merak etmiş olmalısınız:
- Bu komut bir geometri yöneticisidir. Parantezler boşsa hiçbir şey yapmaz.
- Ancak, komutunuzu şu şekilde değiştirebilirsiniz: "b.grid (row = 1, column = 1, sticky = W)". Metin alanı şimdi satır 1 ve sütun 1'de olacak ve batıya doğru hizalanacaktır (ekranın sol kenarı).
- Tek tek nesnelerin konumunu ve yönünü belirtmek için grid komutunu kullanabilirsiniz. Bununla birlikte, bu komut satırında 0'ın ilk satır ve 0 sütununun ilk sütun olduğunu unutmayın.
- Izgara geometrisi yöneticisine ek olarak, paket geometrisi yöneticisi de vardır. Örnek olarak "b.pack (side = 'top', fill =" x ", padx =" 5 ", pady =" 10 ")" komutu verilebilir. "Side" özelliği ile GUI'deki konumu belirleyebilirsiniz. "Fill" özniteliğiyle, bir GUI bileşeninin yüksekliğini ve genişliğini belirtilen kareye ayarlayabilirsiniz. "Padx" ve "pady" ile bir GUI bileşeninin çevresindeki boşluğu tanımlayabilirsiniz.
- Ancak, bir Python programında ızgarayı veya paket geometrisi yöneticisini kullanabileceğinizi unutmayın. Ama ikisi de asla aynı anda değil.
GUI programlama: düğme ekleme
Çok sık düğmeler programlarda da bulunabilir. Python'da üç önemli standart düğme vardır:
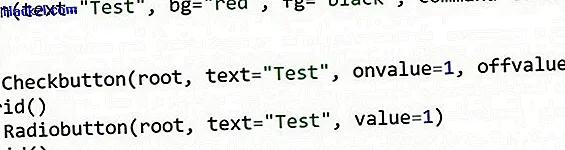
- Örneğin, normal düğmeyi "button1 = Button (text =" Test ", bg =" red ", fg =" black ", command = test1)" (tırnak işaretleri olmadan) komutuyla ekleyebilirsiniz. Bu düğmeye basılırsa, "test1 ()" işlevi yürütülür.
- Normal düğmelere ek olarak, kontrol düğmeleri de denir. Bunun bir örneği "checkbutton1 = Checkbutton (root, text =" Test ", onvalue = 1, offvalue = 0, değişken = var1)" olabilir. Önceden "var1 = IntVar ()" komutunu eklemeniz önemlidir. Programın "var1" değişkeninin bir tamsayı değişkeni olduğunu bilmesi için tek yol budur. Onay kutusu etkinleştirilirse, "var1" değeri "1" (değer) değerini alır. Onay kutusu etkinleştirilmezse, 0 (değer) değeri kabul edilir. İpucu: Bu değeri "var1.get ()" komutuyla öğrenebilirsiniz.
- Sonunda radyo düğmesi var. Bunu "radiobutton1 = Radiobutton (root, text =" Test ", value = 1)" komutuyla ekleyebilirsiniz. "Değer" altında aynı değere sahip tüm radyo düğmeleri, bu düğmelerden biri etkinleştirilir etkinleştirilmez etkinleştirilir. Bu nedenle, yalnızca bir düğmenin etkinleştirilmesi için her seferinde farklı bir değer girmelisiniz.
- Bu arada, düğmelerinizi ızgara veya paket geometri yöneticisiyle yönetmeyi unutmayın.
Python: Terminali Gizle
Terminal normalde GUI olsun veya olmasın her Python programı için görüntülenir. Ancak, bu özellikle GUI'li programlar için çok can sıkıcı bir durum. Ancak, gizleyebilirsiniz. Şimdi bunu Windows 10'da nasıl yapacağınızı gösteriyoruz:
- Gezgin'i başlatın ve "Görünüm" sekmesini tıklayın.
- Şimdi "Dosya adı uzantıları" onay kutusunun etkinleştirildiğinden emin olun.
- Python dosyanızı, dosya uzantısı artık .py değil .pyw olmayacak şekilde yeniden adlandırın.

CHIP rehberlerimizde Python hakkında daha fazla ipucu
İpucu: Diğer programlama eğitimlerini Python programlama dili konu sayfamızda bulabilirsiniz. Burada, örneğin, aralık ve xrange işlevlerini nasıl kullanabileceğinizi gösteriyoruz.