iPhone: Acil durum kartı oluşturun - nasıl çalışır
İPhone'unuzu, hastalıklar, alerjiler ve kan grubu gibi kendinizle ilgili tüm önemli tıbbi bilgileri sağladığınız bir acil durum pasaportu oluşturmak için kullanabilirsiniz. Acil bir durum ortaya çıkarsa, yardımcılar kayıtları rehber olarak kullanabilir. Acil durum pasaportunu nasıl ayarlayacağınızı ve iPhone'unuzdaki yabancılar için nasıl erişilebilir hale getireceğinizi göstereceğiz.
iPhone: Sağlık uygulamasını kullanarak acil geçiş kartı oluşturma
İPhone'unuzda önceden kurulu olan "Health" uygulamasını tıklayın ve sağ alt kısımdaki "Emergency Pass" öğesine geçin.
- Bilgilerinizi girmek için sağ üstteki "Düzenle" ye basın.
- Buraya ilgili tüm alanları doldurun. "Hastalıklar ve Bulgular", "Alerjiler ve İntoleranslar", "İlaçlar", "Acil Durumda Temas", "Kan Grubu" ve "Organ Bağışı" maddeleri özellikle önemlidir.
- Sağ üstteki "Bitti" düğmesini kullanarak bilgileri kaydedin.
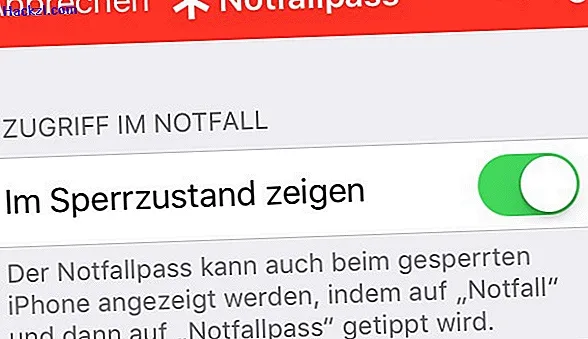
Acil durum pasaportunun yardımcılar tarafından erişilebilir olmasını sağlayın
Tabii ki iPhone şifrenizi bilmeyen yardımcıların acil durum pasaportunuza erişebilmesi için aşağıdaki ayarları yapmanız gerekir:
- "Acil Durum Kartı" altındaki Sağlık uygulamasında sağ üstteki "Düzenle" yi tıklayın
- Burada, denetleyiciyi "Kilitli durumda göster" bölümünde sağa hareket ettirin ve değişikliği "Bitti" ile kaydedin.
- Artık acil durum pasaportunuza kilit ekranından erişebilirsiniz.
- Bunu yapmak için, sol alt kısımdaki "Acil Durum" u ve sonra tekrar "Acil Durum Geçidi" nin sol alt tarafındaki "Acil Durum" u tıklayın.