
Thunderbird'de e-posta kimliklerini ayarlama - İşte nasıl
Thunderbird'de kimlikler ayarlayarak, e-postalarda alternatif gönderen adresleri kullanabilirsiniz. Bunu neden yapmanız gerektiğini ve kimliklerin nasıl ayarlanacağını buradan okuyun.
Thunderbird'deki kimlikler - avantajları
Thunderbird'deki kimliklerle, tüm adreslerinizden hepsini dahil etmeden kolayca e-posta yazabilirsiniz:
- İster iş amaçlı ister kişisel amaçlı olsun, Thunderbird'de ayarlanmış tek bir hesapla tüm e-posta adreslerinizden e-posta gönderebilirsiniz.
- Alıcılar, bir kimlik veya doğru e-posta adresi kullanıp kullanmadığınızı fark etmez.
- Bir Google hesabıyla birlikte, iş, ev veya hobi gibi farklı durumlar için farklı e-posta adresleri ayarlayabilir ve hepsini bir Thunderbird hesabı aracılığıyla yönetebilirsiniz.

Thunderbird'de e-posta kimlikleri ayarlama
- Öncelikle Thunderbird'de e-posta hesaplarınızdan birini ayarlamanız gerekir. Örneğin, tüm e-postalarınızı tatildeyken evden göndermek istiyorsanız, özel adresinizi bu amaçla da kullanabilirsiniz.
- Soldaki listeden e-posta hesabını sağ tıklayın ve Ayarlar'ı açın.
- Şimdi açılan pencerede. hesabınızı tekrar seçin. Sağ alttaki "Diğer kimlikler ..." düğmesini tıklayın.
- Artık "Ekle ..." ile yeni bir kimlik oluşturabilirsiniz. Thunderbird'den e-posta göndermek istediğiniz kimliğini ve e-posta adresini girin. "Yanıtlama adresi" alanında yanıtların orijinal adrese mi yoksa ev adresinize mi gönderileceğini de belirleyebilirsiniz. Ayrıca ayrı bir imza da ayarlayabilirsiniz. Sonra "OK" ile onaylayın.
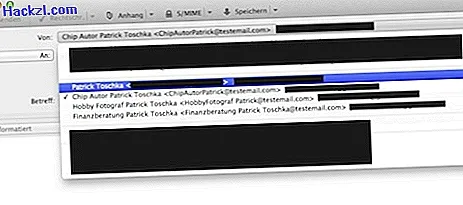
- Artık yeni bir e-posta yazarken "Kimden" alanında oluşturulan kimlikleri seçebilirsiniz. Önceki pencerede bir imza tanımlayıp tanımlamadığınıza bağlı olarak, kimlik seçtiğinizde bu otomatik olarak e-postaya eklenir.
Başka bir pratik ipucu, e-posta göndermenin yanı sıra Thunderbird'de gelen iletileri otomatik olarak nasıl filtreleyeceğinizi gösterir.